Showing posts with label water. Show all posts

Wednesday, April 3, 2013

Maintaining A Healthy Rain Barrel

  It doesn't matter if you collect rain water for your own consumption or to water your garden, you still need to do a yearly maintenance to them. Why? Its to keep them in tip top shape and it keep's the water in them safe for you and your plants.You wouldn't believe the stuff that gets inside of them, especially when they aren't in much use (in the off season)! So what are the thing's you should do to your rain barrels or other rain collection systems? (Click her to learn how to make a Rain Barrel)  Also You may like Got Rain Barrel Questions?
  Take a good look at them before you even drain them and remove them from the stand you have them on. As you can see by from my pictures, the winter freezing of the ground made mine a little unlevel and some of  my connections come apart. So I will have to fix that as well!
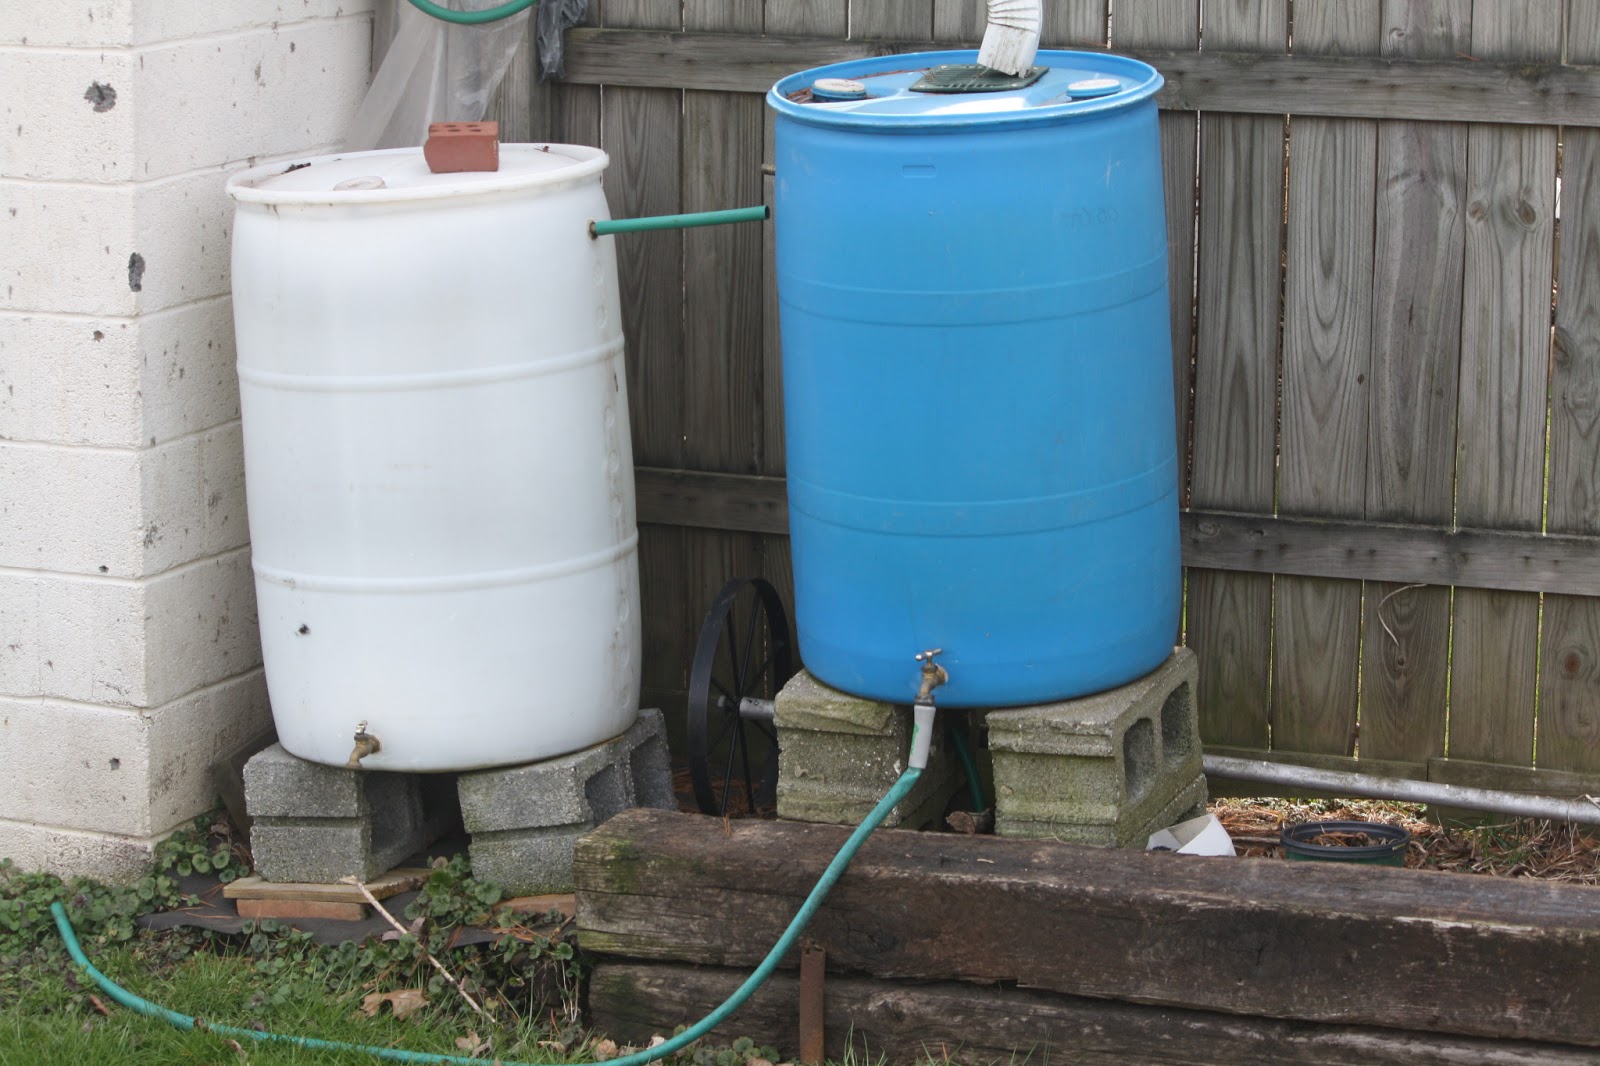
See how the became unlevel

Check All The Hardware:
  You will want to totally drain your barrel before you get started. Then Check all your valves, connection, screens that you may have at the enter point and the overall condition of the barrel or container, replace anything that needs replaced. Look inside it, I am sure you will see lots of yucky stuff, maybe even algae but that's okay we are gonna take care of all of this shortly and even have some preventative maintenance. At this point just spray out with you garden hose as much as you can.

Clean The Inside:
  If you need to scrub the interior of the barrel a long handled brush will work well. Using a mixture of  light bleach and water solution; scrub the interior of the barrel’s walls and bottom with the brush. Then rinse your barrel again and let dry. This is something that you may not have to do if you have a constant flow of water going through your barrels. But if you forgot to drain all the water out for the winter, Yuck!


Tip: Paint your rain barrels a dark color to prevent the sunlight from directly hitting your water and promoting algae growth.

Purifying The Water For Drinking and To Maintain:
  You can add a little household bleach to your water to keep it maintained through out the year. A little won't hurt you plants either. I would put a little less in the water if you arn't gonna drink out of it and it will still keep the water cleaner!
   According to the Red Cross, “The only agent used to purify water should be household liquid bleach. Add 16 drops of bleach per gallon of water if the water is cloudy (with an eye dropper), stir and let stand for 30 minutes. (If it’s clear, only add 8 drops.)  If the water does not have a slight bleach odor [after 30 minutes], repeat the dosage and let stand another 15 minutes.”  Use household bleach (5.25% sodium hypochlorite as its only active ingredient) and yes this is for drinking!
 
How much bleach to use for purifying water for drinking (according to the Red Cross):

amount of water clear water cloudy water
1 quart 2 drops 4 drops
1 gallon 8 drops 16 drops
5 gallons 1/2 teaspoon 1 teaspoon
55 gallons 5 1/2 teaspoons 11 teaspoons

After I built a foundation out of railroad ties.

 Revelation 21:1"And he showed me a pure river of water of life, clear as crystal, proceeding from the throne of God and of the Lamb."

  Linked With:
Blog It UP!, Down Home Blog Hop, Home and Garden Thursday, Thursdays Favorite Things, Simple Lives Thursday, The HomeAcre Hop, Bloglovin, Friday Fertilizer Flaunts, Freedom Fridays, Linky Love Blog, Simply Natural Living, Farm Girl Friday, Homestead Saturday, Pinteresting Party, Sunny Simple Sunday, MMM, Clever Chicks Hop, Natural Living Monday, Harvest Monday, Teach Me Tuesday, Backyard Farm Connection, Tuesday Garden Party

Saturday, January 19, 2013

"Great Soil is a Gardens Foundation", Part 2

   Okay, so now I am sure you have figured out what your soil pH is, what type of soil you have, if it has the right drainage and how your microorganisms are in your soil! Right? That is if you read part 1 last week?? So here are some tips and secrets to help your soil.

#1 If your soil isn't draining correctly, its probably because it's clay soil! So what can you do? Feed it lots of Organic Matter! Dig in lots of chunky like straw, pine needles, wood chips. You can also work in leaves, grass clippings, animal manure (not dog or cat), or my favorite thing, Compost. These will open up the soil so that nutrient and worms call move through the soil better.  
        Tip: Fresh organic matter uses lots of nitrogen during the break down process. But you can correct this if you will add one of these three things to each bushel of organic material you add to the soil.
         1 pound of nitrate of soda or (Ammonium sulfate, ammo-phos, cottonseed, soybean meal, or tankage)
      1/2 pound of ammonium nitrate
      1/2 pound of ammonium sulfate

#2 Dig in your Organic material in the fall,  the best way to do this is by Double Digging. 
         What is double-digging? Nothing more than loosening the soil more than 12 inches down to create conditions that your plants' roots can stretch their legs out in and soak up more nutrients and water!
         How do you double dig?  Begin at one end of the bed and dig a 1-foot-wide by 1-foot-deep trench across the bed's width, placing the excavated dirt in a wheelbarrow or tarp. Next, work a garden fork into the floor of the trench and slowly rock it back and forth to loosen the soil. Continue until the soil in the excavated area is loosened. Dig a second, similar-size trench next to the first, this time placing the excavated soil in the first trench. Loosen the soil at the bottom of the second trench with the garden fork. Dig another trench and back fill the second trench, loosen the bottom of the third trench, and continue this process until you reach the end of the bed. Fill the last trench with the soil excavated from the first.   Note: As you go remember to work in any and all Organic Material that you are going to use, this will work it deep into the soil.
          Tip: If its an existing bed or the middle of the growing season, you can use a garden fork to loosen the soil. Just push it in the ground as fare as you can, work it back and forth, pull the fork out, move the fork a few inches and repeat the first step. After you get done with the fork, spread lots of compost or smaller organic matter and it will works its way down into the fork holes.
              *  For larger fields like hay fields or lawns, uses a Lawn Aerator, Spiker, Plugger, Core Aerator, or Aerifier in place of a garden fork and spread lots of compost or smaller organic matter and it will works its way down into the fork holes. Most of the time with a hayfield it get's to acidic because of all the animal urine. So it will probably need more lime than anything to correct the problem.

#3 Back To Eden? There is another wonderful way to get larger and even smaller areas back to a most perfect way to grow and its rather simple! HURRY TELL ME! I knew you would ask, lol! Check out this video called "Back to Eden", its amazing how he prepared his site to garden. It is a 2 hour video but what else do you have to do on a cold winters evening! On-line video

#4 If you don't want to go through all that work, do like I do and build "Raised Beds" and garden in those. That way you can control the type of soil and its drainage.


  Here were just a few more tips for your soil. Remember more time spent here will be worth it in the long run. Playin in the dirt is a lot of fun, so dig in there! Next week we should finish our talk on soil.


"Grace is God giving us what we do not deserve and mercy is God not giving us what we do deserve."

 Linked With:
Harvest Mondays, Back Yard Farming Connection Hop, The Country Garden Showcase, Teach Me TuesdayWildcrafting WednesdayDown Home Blog HopCountry Homemaker Hop, The HomeAcre HopThursdays Favorite Things, Fridays Fertilizer Flaunts, Fantabulus Fridays, Weekend Whatever, Farm Girl Friday, Farm Girl Blog Fest, Clever Chicks Blog Hop, On it, In it and Around it, A Pinteresting Party, Sweet Saturday 

Saturday, January 12, 2013

"Great Soil is a Gardens Foundation", Part 1

   Good soil in the garden is like building your house on a Solid foundation or feeding your children a well balanced diet! Over the next few posts I will give tips and suggestions on how to get your garden soil to the best it can be. I have covered some of these things before and will link back to them as we go. I remember my dad and Grammie spending more time preparing the "dirt" in the garden more then anything. Not only would they spend time on the soil for the garden but they would test all the hay fields on the farms, so it must have been important! Plus that's where all those good vitamins and minerals come from that you want to put into your body!  So how to get it to it's best?
   #1 You want to do is test the pH of your soil, it doesn't matter if it is in the garden, lawn, hayfield or even your potted houseplants. Yes, I said potted houseplants, even the pH in them will change overtime. The ph (acidity level) of your soil has a large part to do with how well your plants grow, ph is tested on a scale of 0 to14, with 0 being very acidic and 14 being very alkaline. Most plants grow best in soil with a fairly neutral ph, between 6 and 7. When the ph level is lower than 5 or higher than 8, plants just won’t grow as well as they should, unless that is the area that they grow best in. Every Home and Garden store sells these kits or you can send your samples of to your local agriculture dept. to have professionally tested.
   Note: My new friend at "Let This Be in You" blog, has a wonderful in depth post on "Soil Testing", so please click the link to go read more about this!
  #2 You want to do a composition test or "the squeeze test" as Grammie called it. Soils are classified as clay soils, sandy soils, or loamy soils. Clay is nutrient rich, but slow draining. Sand is quick draining, but has trouble retaining nutrients and moisture. Loam is generally considered to be ideal soil because it retains moisture and nutrients but doesn’t stay soggy.
   To figure out your soil type, take a handful of moist (but not wet) soil from your garden, and give it a firm squeeze. Then, open your hand. One of three things will happen: 1) It will hold its shape, and when you give it a light poke, it crumbles. Lucky you—this means you have luxurious loam! 2) It will hold its shape, and, when poked, sits stubbornly in your hand. This means you have clay soil. 3) It will fall apart as soon as you open your hand. This means you have sandy soil.
   Now you can work on improving it, unless you are one of the Blessed ones with Loamy soil and you can just keep adding good Ol "Black Gold" Compost or you may have to work to improve it and we will talk about that a little later!
  #3 Next you can do the "Percolation Test", this determines the drainage of your soil. This is good to know because some plants grow much better in a well drained soil and some obviously do not! To test your soil’s drainage: 1) Dig a hole about six inches wide and one foot deep (Dad used a post hole digger, if you have one). 2) Fill the hole with water and let it drain completely. 3) Fill it with water again. 4) Keep track of how long it takes for the water to drain.
   If the water takes more than four hours to drain, you have poor drainage (Clay Soil) and if it drains right out within minutes that can be a problem as well (sandy soil)!
  #4 Finally, you want to do the "Garden Champion" test. You know check for your hardest workers, Worms, lol! Worms are great indicators of the overall health of your soil, especially in terms of biological activity. If you have earthworms, chances are that you also have all of the beneficial microbes and bacteria that make for healthy soil and strong plants.
   How to do the worm test? 1) Be sure the soil has warmed to at least 55 degrees, and that it is at least somewhat moist, but not soaking wet. 2) Dig a hole one foot across and one foot deep. Place the soil on a tarp or piece of cardboard. 3) Sift through the soil with your hands as you place it back into the hole, counting the earthworms as you go.
   If you find at least ten worms, your soil is in pretty good shape. Less than that indicates that there may not be enough organic matter in your soil to support a healthy worm population, or that your soil is too acidic or alkaline.Then you need to check the pH again!
    Tip: If you are lacking worms, you can either buy some to add or when you add fresh compost or maybe a friend has some good rich horse manure you can add. Any of these ways will bring a good host of them back to you garden! 
  This will get you started, now onto some other important soil tips in the next part!

For more reading:
 "Great Soil is a Gardens Foundation", Part 2
"Great Soil is a Gardens Foundation", Part 3


Matthew 13:3  "Then He spoke many things to them in parables, saying: “Behold, a sower went out to sow.....8 But others fell on good ground and yielded a crop: some a hundredfold, some sixty, some thirty. He who has ears to hear, let him hear!”


 Linked With:
Harvest MondaysBloom DayThe Country Homemaker, TALU Tuesday, Teach Me Tuesday, Frugal Tuesdays, Frugal Days Sustainable WayWildcrafty Wednesdays, Wednesday Link Party, The Home Acre Hop, Country Garden Showcase, Farm Girl Blogfest Fridays Fertilizer Flaunts, Fantabulus Fridays,  Farm Girl Friday, Clever Chicks Blog Hop,, Simply Natural Saturday, 
Sunny Simple Sunday Link

Monday, August 27, 2012

U.S. Drought 2012 and a story of my Grammie

As everybody  in the U.S. knows we have had a very dry summer! It reminds me of one hot dry summer that I stayed with my Grammie. We had three large gardens going as always, since we preserved everything. I was about 13 and when I say hot, I mean hot! I would drive the tractor, with her on the back from garden to garden as we picked and watered. The road to the potatoes garden was very bumpy. On one of the hottest days of this summer, as always I drove her up the road but this time was a memorable event. As I drove she would say, "speed up its hot", then "slow down, you are jarring me to death", then "come on Clint we have to hurry", then "Please slow down I am about to bounce off". I couldn't please her, lol! So I stopped and asked her how she wanted me to drive, lol! To this day we laugh and talk of that day!
Well below is an article on the weather her this year. When you get  to the bottom the is a link to a map that monitors the damaged areas of this drought. West Virginia doesn't look that bad but to us it feels awful. I can't even imagine what the rest of you are going through! It looks like many areas need lots of prayer! So water water water those plants! Make a Few Rain Barrels to collect water.

"STATE REMAINS ABNORMALLY DRY, DESPITE RECENT RAIN"
Article from http://www.wvagriculture.org/index.html
  Most of West Virginia remained “abnormally dry,” according to the U.S. Drought Monitor map dated July 17, 2012. However, recent rains resulted in a small portion of southwest West Virginia being removed from drought status, an improvement over previous conditions that showed three-quarters of the state’s topsoil moisture ranked as “poor.”
   Despite marginal farm conditions, West Virginia has not had it nearly as bad as the majority of the country, which is suffering from an unprecedented heat wave and an historic drought.
   Nationally, nearly 90 percent of the nation’s corn and soybean crops are located in drought-stricken areas. The worsening drought conditions will likely drive up food prices in the near term, and meat prices by next year because corn and soybeans are predominant ingredients in animal feed.
   “I have requested farmers to keep detailed records of drought-related losses in the hope that Congress restores emergency funding to the Farm Bill that’s currently under consideration,” said Commissioner of Agriculture Gus R. Douglass.
   He called on Congress to move the bill to the White House and to consider the plight of the farmers who had high hopes for a record corn crop earlier this year.
   “Farming is the most important industry in this country,” said Commissioner Douglass. “First, it provides the food we all rely upon each day. Second, it is among our most-important exports, regardless of the condition of the world economy at any given time. And third, it represents the finest of American ideals: ingenuity, hard work and service to others. As a nation, we must do what it takes to get these family businesses through this potentially ruinous natural disaster.”
   The national drought map can be found at www.droughtmonitor.unl.edu. The U.S. Department of Agriculture National Agricultural Statistics Service (USDA-NASS) has detailed weekly reports on crop and weather conditions around the country. Visit http://www.nass.usda.gov/Publications/State_Crop_Progress_and_Condition/index.asp for more information.


The West Virginia Department of Agriculture protects plant, animal and human health through a variety of scientific, regulatory and consumer protection programs, as mandated by state law. The Commissioner of Agriculture is one of six statewide elected officials in West Virginia. For more information, visit www.wvagriculture.org.

Tuesday, July 17, 2012

Update:"HUGELKULTUR", Raised Bed Experiment Part2

  Well here is an update on my Hugelkultur Bed that I started this spring. I planted three things in the bed to see what it would do (zucchini, Yellow Squash and Cinderella pumpkins). All three are doing remarkable, even through this very hot and dry weather we have had this summer. I have hardly watered it at all, just to see if it does what they say! So far, so good! As you can see by the pumpkin vines, they are doing the best. I have just swirled (yes "swirled" is a Jethro Bodine word) the vines around the Raised Beds in the walk area, Remember in a Urban Garden you try to use all the space you can.
  I am so impressed with this experiment that I plan to do a few more beds just like this one! It has really cut down on my watering in this bed and that was a blessing because where it has been so dry, my Rain Barrels went totally dry, but finally this past week we have had enough rain to fill them back up. Well, I will just leave with a few pictures of what it looks like!
Hulgelkultur Bed


John 15:1-3 “I am the true vine, and My Father is the vinedresser. Every branch in Me that does not bear fruit He takes away; and every branch that bears fruit He prunes, that it may bear more fruit. 


Linked With:
Home and Garden Thursday 
Frugal Days 
The Country Homemaker 

Thursday, June 21, 2012

"Amazing,Hydropnic's"

  Have you ever needed a way to water those plants when you are away on vacation? Or have you ever just wanted to mess around with hydroponics? Well look at what my mad scientist neighbor did here! My friend Jason and his hydroponics are amazing! He has such a talent for these types of things and I wanted to share this one with you, so that maybe it would strike up the creative juices.
Day 1
1 Week later


It is amazing how this thing works, very smart feller if I may say so! Here below is a drawing of how he put it together! He said he just used a cheap pump and trash can!
Drawing
Front view, after 2 weeks!

I hope you experiment with this and let us know how it goes! You may have some ideas of improvement! He told me this would be an awesome way to water your plants when you are on vacation. Wait a minute that may be why he showed this to me and brought that up! I do ask him to water my plants sometimes when we go out of town, lol! No, we would do that for each other anytime, I think! LOL!


“Friendship is born at that moment when one person says to another: "What! You too? I thought I was the only one.” ― C.S. Lewis


Linked with:
Teach Me Tuesday
Frugal Tuesday Tips
Tuesday Garden Party
Barn Hop 67
Make A Move Monday
Farm Photo Friday!
Garden Life

Sunday, January 15, 2012

Making A Rain Barrel

  With the cost of utility bills so high these days and needing a good water supply for your garden. Plus when my wife came to me and said that our water bill had almost doubled since the start of spring, I knew it was time to do something. So I looked into rain barrels. You can catch gallons of water for your plants and rain water is so much better for them. city water, city water has fluoride and chlorine in it. While city water won't kill the plants it does affect their growth. You will see much healthier and greener plants if you have away to save up rain water. You can buy them already made up or you can do like I did and make your own. You can use many different things to catch water in and as long as you place it at a bottom of a down spout and it doesn't leek, everything will work just fine.
  

  Here are my Rain Barrels completed! I made mine a little differently than in the information video I posted. The video is very informative and shows you step by step on how to build one. You can find these 55 gallon plastic drums at car washes, most of the time for free or very little. I have approx. 110 gallons of water and that goes along way. Make sure to drain it part way for the winter, so it will give the water room to expand and not bust the drum if it freezes. Well gook luck and have fun!


Linked up with: http://www.randeesorganizedchaos.com/


John 4:11  The woman said to Him, “Sir, You have nothing to draw with, and the well is deep. Where then do You get that living water?

Monday, January 9, 2012

"Q&A before you start tilling"

   Before you start planning what you are gonna plant in your garden you need to determine a few things to be successful. Things to think and survey before you start planning your garden.

  1. What planting zone are you in?   http://www.usna.usda.gov/Hardzone/ushzmap.html
  2. When is your last spring frost and your first spring frost? West Virginia's are approx. April 20/Oct. 20. This may very do to the elevation or area you are in. 
  3. Where will I get the best sunlight? Full sun all day is the best, but if you don't have that, pick a spot that gets full morning sun.
  4. Do you have a good water source? Plants need lots of water and city water isn't the best for them because of all the chlorine and fluoride in it. If possible collect water to water your plants and it will save you money.
  5. What type of soil do you have? It ranges from sandy to clay soil.
  6.  What is the PH of your soil? Plants are like people, they don't all like to lay down roots and eat the same thing.
  7. A few things you can do to get the soil ready is to, work in compost or manure in the fall, leaves and straw help as well. If you can attract worms to the garden, they are awesome little creations of God's. They will do a lot of the work for you. Just work into the soil table scrapes minus fats, meats and oils and they will move right in and start to work.
  8. How big is your garden gonna be? Gardens range from pots on your deck to raised bed gardens to full size conventional acre size gardens. If you have never gardened before start small and don't do more than you can handle.
  9. From experience, protect your garden from children playing and you wonderful pets. This past year I had so many volleyballs hit my plant I thought for sure they would all die and Maple well she was a little puppy, need I say more?

Now after you figure out where your garden is gonna be. you can start to plan it out and order your seeds or plants. Have fun and God Bless!