Just some food for thought.The more you
read the Bible; and the more you meditate on it, the more you will be
astonished with it.
I found this the other day and thought it was so true to today'sChristian. Think of all the things we would solve if we did this?
"If you find a
professing Christian indifferent to his Bible, you may be sure that the very
dust upon its cover will rise up in judgment against him. I venture to
say that the bulk of Christians spend more time in reading the newspaper than
they do reading the Word of God." ~ C.H. Spurgeon
Well I had a good day in the Garden! I added more raised beds, I'm running out of space to plant. It seems that when your family starts to understand how much better home grown veggies taste and how much healthier they are for your, you have to grow more. Which is a great thing! So I added 48 more square feet of garden space tomy Raised Beds. Here is the best thing, all it cost me was the labor. How you may ask did I do that? Well, this past fall, when I pulled in from work, I realized that the neighbor had a big pile of scrap boards that they were throwing out. So I knocked on the door and asked if I could have them and they said YES! So you see, "One mans trash is another mans treasure"! Here is some pics for ya!
New 5' x 8' Bed
New 2' x 4' Bed
So you see don't let living in the city keep you from getting your hands dirty and growing your own veggies! You can Urban Garden for a very inexpensive cost, if you just think! You might be saying, "where do I get the dirt to fill them up?" Well most of mine is from my compost bins or my good friends horse farm, there are manySoil Amendments available. You can also do a "HUGELKULTUR", Raised Bed Experiment, like I have done, if you would like. Where there is a will there is a way! Just start small and build your way up to whatever size you may need. Maybe even ask a neighbor to help and it can become a group effort, many community gardens have been started like that. The main thing is have fun!
Matthew 19:19 "‘You shall love your neighbor as yourself.’ ”
Its getting time here in West Virginia to plant tomatoes out doors! I usually wait until around "Mothers Day", but this year I may do it a little early and just watch the night time weather for frost and such. What brought this question up, was a friend ask me for some tips on tomatoes and I thought I had this on here but I didn't.
So, how far apart should I space my tomato plants? This depends on whether you are staking, caging, or letting them sprawl
and on the particular variety’s growth habit of dwarf, determinate, or
indeterminate. Staked indeterminates can be grown with spacing of
1 foot between plants, caged indeterminates can be grown with spacing of
2 feet between plants, and for sprawling, you need at least 3 feet between
plants. They will be more productive if more space is given.I have grown indeterminates 3 feet between plants and 4 feet between rows (remember is you are planting in raised beds you can get by with 2 feet but that's as close as I would go)..
This gives them enough room to sprawl out and really produce. Determinates
can be planted a bit closer than indeterminates especially if they are
let sprawl. They will produce well with 2 feet between plants and
3 feet between rows. Again, I have gotten by with a little closer but remember, the more light and air the more productive they will be. The dwarf varieties are suitable for pot culture
but if grown in soil, they can be planted as close as 1 foot apart. A major contributor to the spacing question is the area of soil the roots
expand into. A large tomato plant may have roots 3 feet or more deep
and up to 10 feet long from the plant stem occupying up to 300 cubic feet
of soil. Most people plant tomatoes too close together which reduces
overall production. If given a choice between having more plants with less fruit or less plants with more fruit production, I would never plant indeterminates
closer than 3 by 5 feet! But sometimes we don't always have that space. The soil should be a good quality loam with loose texture. Since
most of us don't have soil with those characteristics, it is best to work
on building up the soil we have. A soil test will tell the pH level
and give recommendations to raise or lower it if needed. Tomatoes
grow best in soil with a pH of 6.0 to 6.5 which is just a bit on the acid
side.
Planting Tip: Start by getting a vigorous seedling to set out, hopefully that you have started. Mix topsoil, 5 gallons of high quality compost, 1 cup
of 13-13-13 fertilizer, ½ cup of cane sugar, ¼ cup of table
salt, Ground tho powder eggshells and 1 level shovelful of hardwood wood ashes in a wheelbarrow. As you plant Put 3 inches
of of mixture in bottom of hole, put an inch or so of plain topsoil on top and set a seedling into the plain soil so that
its roots can grow into the amended soil beneath. For the 1st week or so water everyday with a couple cups of warm water to stimulate plant growth, remember tomatoes are warm weather plants.
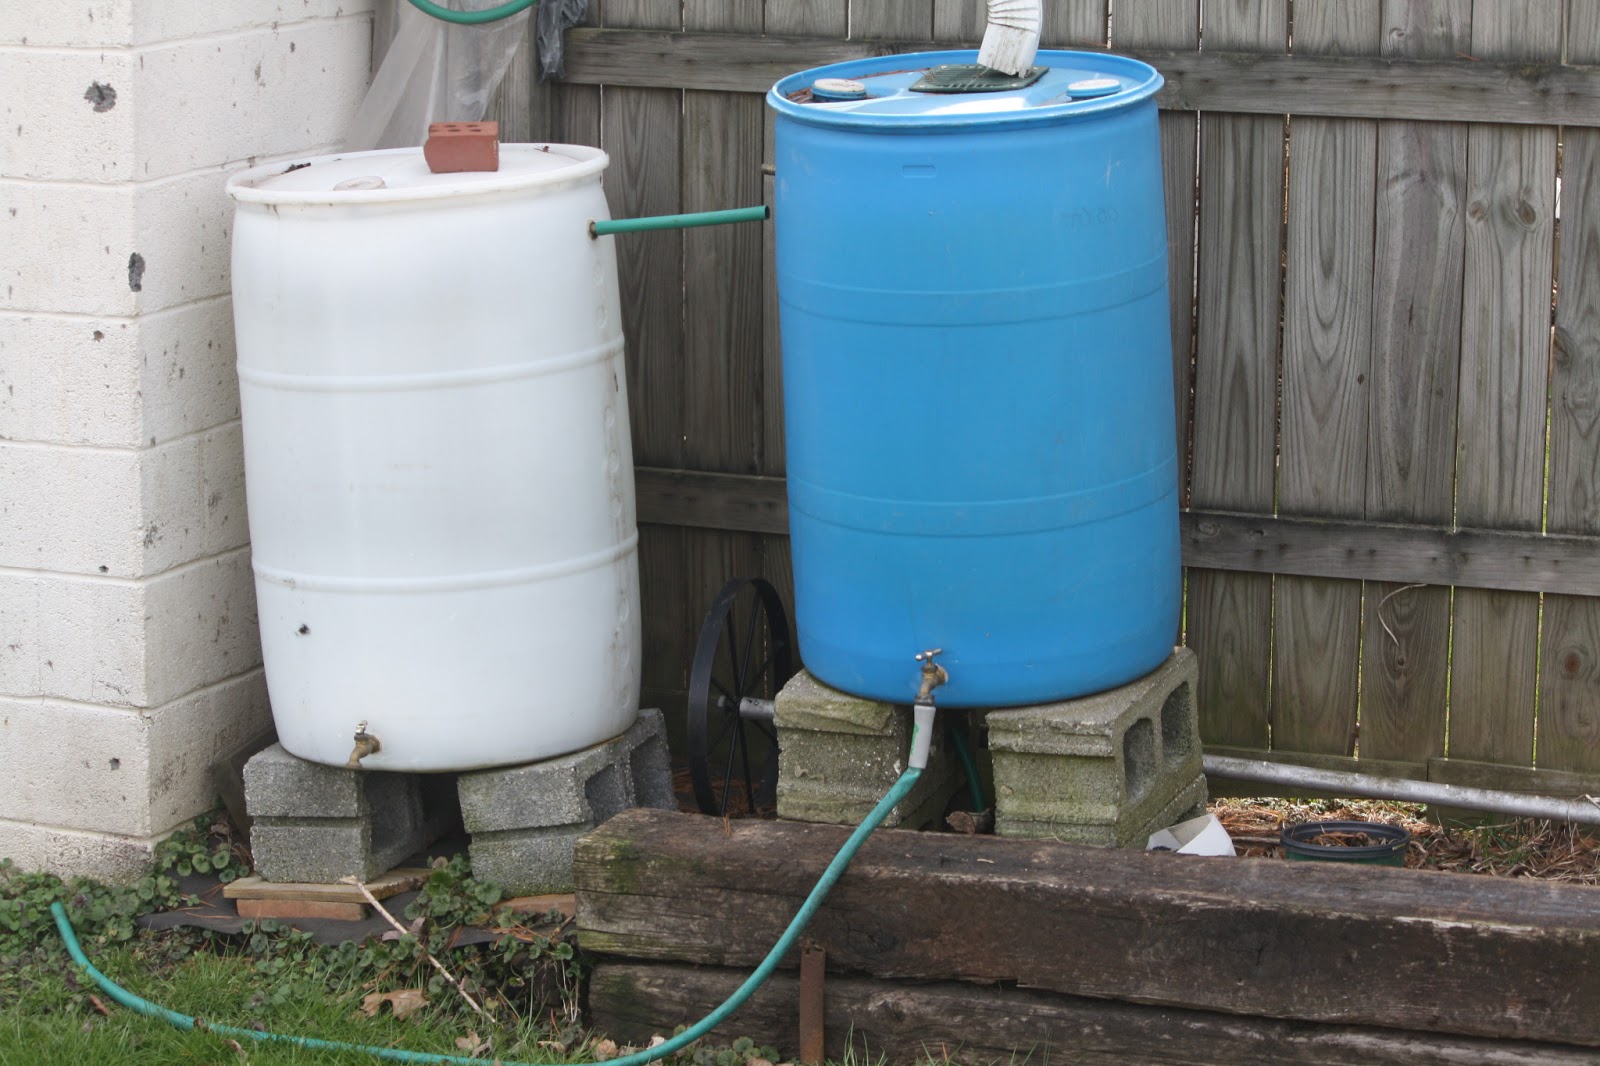
It doesn't matter if you collect rain water for your own consumption or to water your garden, you still need to do a yearly maintenance to them. Why? Its to keep them in tip top shape and it keep's the water in them safe for you and your plants.You wouldn't believe the stuff that gets inside of them, especially when they aren't in much use (in the off season)! So what are the thing's you should do to your rain barrels or other rain collection systems? (Click her to learn how to make a Rain Barrel) Also You may like Got Rain Barrel Questions?
Take a good look at them before you even drain them and remove them from the stand you have them on. As you can see by from my pictures, the winter freezing of the ground made mine a little unlevel and some of my connections come apart. So I will have to fix that as well!
See how the became unlevel
Check All The Hardware:
You will want to totally drain your barrel before you get started. Then Check all your valves, connection, screens that you may have at the enter point and the overall condition of the barrel or container, replace anything that needs replaced. Look inside it, I am sure you will see lots of yucky stuff, maybe even algaebut that'sokay we are gonna take care of all of this shortly and even have some preventative maintenance. At this point just spray out with you garden hose as much as you can.
Clean The Inside:
If you need to scrub the interior of the barrel a long handled brush
will work well. Using a mixture of light bleach
and water solution; scrub the interior of the barrel’s walls and bottom
with the brush. Then rinse your barrel again and let dry. This is something that you may not have to do if you have a constant flow of water going through your barrels. But if you forgot to drain all the water out for the winter, Yuck!
Tip: Paint your rain barrels a dark color to prevent the sunlight from directly hitting your water and promoting algae growth.
Purifying The Water For Drinking and To Maintain:
You can add a little household bleach to your water to keep it maintained through out the year. A little won't hurt you plants either. I would put a little less in the water if you arn't gonna drink out of it and it will still keep the water cleaner!
According to the Red Cross,
“The
only agent used to purify water should be household liquid
bleach.
Add 16 drops of bleach per gallon of water if the water is cloudy (with an eye dropper), stir
and let stand for 30 minutes. (If it’s clear, only add 8
drops.)
If the water does not have a slight bleach odor [after 30 minutes],
repeat
the dosage and let stand another 15 minutes.” Use household
bleach
(5.25% sodium hypochlorite as its only active ingredient) and yes this is for drinking!
How much bleach to use for purifying water for drinking (according to the Red
Cross):
amount of water
clear water
cloudy water
1 quart
2 drops
4 drops
1 gallon
8 drops
16 drops
5 gallons
1/2 teaspoon
1 teaspoon
55 gallons
5 1/2 teaspoons
11 teaspoons
After I built a foundation out of railroad ties.
Revelation 21:1"And he showed me a pure river of water of life, clear as crystal, proceeding from the throne of God and of the Lamb."
Good Friday is the Friday before Easter Sunday, and is traditionally
celebrated as the day Jesus died on the cross. Although we don’t know
for sure that Friday was the day Jesus was crucified (there are many
arguments that it may also have been a Thursday or even a Wednesday),
this day was chosen as a remembrance of Christ’s sacrifice for us.
Protestants across denominations usually observe the day
with solemn services consisting of hymns, Scripture readings, prayer,
and retelling of Christ’s death on the cross. Some families choose to
have a quiet service of remembrance at home. God does not require us to
celebrate Good Friday, but it can be a spiritually enriching experience
as we remember the pain Jesus went through both before and during His
crucifixion. It can also be a preparation for the joy that comes when we
celebrate Easter—the day of Jesus’ resurrection—on Sunday.
If Good Friday is such a solemn occasion, then why do we refer to it as
“good”? Although there was technically nothing good about the day Jesus
suffered and died for us, the outcome certainly is! It was the day Jesus
became the perfect, sacrificial Lamb who shed His blood for the
remission of our sins (Romans 5:8; 6:23; 1 Peter 3:18).
This was the greatest act of love known to man—God the Father sent His
Son, Jesus, to die in our place. And because of Jesus’ Sunday morning
resurrection, those who place their trust in Him believe in a living
Savior who will one day return to claim His own (John 14:1–3).
Even if we choose not to celebrate on Good Friday, we should always have
Jesus’ death and resurrection on our minds and hearts. We can
commemorate this throughout the year with prayers of thanksgiving and by
celebrating the Lord’s Supper, which Jesus commanded His followers to
do in order to “proclaim [His] death until He comes” (1 Corinthians 11:26).
A brief visual reminder and great song of this day and its importance!
A few years ago, I was at work fussing about how all my extra long extension cords (50' or more) were getting all tangled up together and how it would take me forever to get a job started because of all of the time it took to untangle. Well one of my buddies said why don't you make a "Cord Bucket"? I said "whats that", so he explained how to do it and I came home and went to town making them and haven't had a bit of tangle ever since.
So what will you need to get the simple project started?
1) A 5 gallon bucket as I used or a plastic container that you can store a single cord in.
2) A drill and a hole saw big enough to get your plug through.
3) Your tangled extension cord.
Start by untangling your cord, of course and lay it in the hot sun. Laying it in the sun will make it more flexible and easier to wind into the bucket! Trust me it makes it a lot easier, when I use my Bucket cord in the cold weather its a little harder to wind in but well worth it.
Then with your drill and hole saw, cut a single whole down next to the bottom of the bucket, (see figure 1). Fish about 4 inches of the cord out.
Then start to wind the cord into the bucket, take your time and wind it all in in one direction, (see figure 2). This will make thing much easier when you use it later.
Figure 1
Figure 2
Finally when you are done you will have a wonderful "Cord in a Bucket" that is so easy to use, rewind and store. My buckets have lids, so that I can stack them!
Notice the plug for the outlet is still sticking out of the bottom of the bucket!
When you need to use it. Just sit the bucket next to an outlet, plug the cord into the outlet and pull out however much cord you need to use, when you are done just rewind the cord back in the bucket and its ready for next time! So easy a Caveman could do it, lol!
James 1 " My brethren, count it all joy when you fall into various trials, knowing that the testing of your faith produces patience. But let patience have its perfect work, that you may be perfect and complete, lacking nothing. ..."
Well Finally! Over the past week I have been able to get my hands dirty in the garden. I have been on cloud 9. First last weekend I got all my tomatoes and peppers started and under the lights. And as of today I have my broccoli plants in the ground. Along with turnips, beets, 2 different radishes, spinach and salad lettuce. But I believe I have ran into a little problem, I think I am gonna have to expand and build more raised beds. See the problem is, I want to plant more that I have room for, SO, off to build I go! At the bottom of this article I left links to some of my past article gardening tips for you to enjoy! I also want to give a shot out for Botanical Interest Seed Company! All of my seeds that (I didn't save from last season) came from them the past two years. I have had great success with their products! At
Botanical Interests, not only is
the seed inside our packets the highest quality available, their packets
are designed (inside and out) to give you the information you need to be a more
successful gardener!