Saturday, February 23, 2013

Pruning Tip's

  This is a great time of the year to prune your trees and shrubs. There is less disease and insects, if any, to get into the freshly pruned area and create havoc! When I wanted to learn "How To Prune" a tree or shrub correctly I turned to the experts. I am not ashamed to say that we just fired up the chain saw and went to cutting up things on the farm. The experts I turned to was The Arbor day Foundation, they know a thing or 2 about trees, lol! Here is what they had to say!
  1. Begin visual inspection at the top of the tree and work downward.
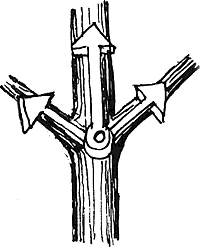
  2. Angles 
  3.  Use The ⅓ and ¼ Rules of Pruning
    1. Never remove more than ¼ of a tree’s crown in a season
    2. Ideally, main side branches should be at least ⅓ smaller than the diameter of the trunk.
    3. For most deciduous (broadleaf) trees, don’t prune up from the bottom any more than ⅓ of the tree’s total height.
    4. Where possible, try to encourage side branches that form angles that are ⅓ off vertical that form “10 o’clock” or “2 o’clock” angles with the trunk.
  4. For most species, the tree should have a single trunk. Identify the best leader and later branches before you begin pruning and remove defective parts before pruning for form.
  5. Don’t worry about protecting pruning cuts. For aesthetics, you may feel better painting large wounds but it doesn’t prevent or reduce decay.
  6. Keep tools sharp. One-hand pruning shears with curved blades work best on young trees.
  7. For high branches use a pole pruner. A major job on a big tree should be done by a professional arborist.
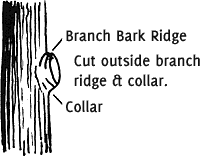
  8. Ridge & Collar For larger branches, cut outside the branch bark and ridge collar (swollen area). Do not leave a protruding stub. If the limb is too small to have formed a collar cut close.
  9. When simply shortening a small branch, make the cut at a lateral bud or another lateral branch. Favor a bud that will produce a branch that will grow in desired direction (usually outward). The cut should be sharp and clean and made at a slight angle about ¼ inch beyond the bud.
    Correct Pruning Cut Too Close Too Long Too Slanted
    Correct Pruning Cut Too Close Too Long Too Slanted
  Thats the Basics! Sometimes its okay to admit you you don't know everything or didn't learn everything growing up and had to find out on your own but that's what make use stronger! If you want to learn more on, "Pruning away the Bad, stuff", read this!


"[People] are not naturally inclined to look at themselves honestly, to perform a self-evaluation under the bright and perfect light of God’s Word. They know instinctively that their pride, self-will and love of sin will be exposed under the Lord’s righteous standards." ~ John MacArthur

Sunday, February 17, 2013

"The Garden Notebook",by Angi Schneider


Check out this new e-book "The Garden Notebook"! Be sure to go check out this new e-book by Angi Schneider, It is gonna be a great one! You can also visit her at http://www.schneiderpeeps.com/!

We must give Him 100% credit!

Jesus putting His righteousness on us!
   Who does the Justifying and the redeeming? And why does it matter? As we will see with God's Word, it is so important that we have these two questions answered correctly. Being redeemed or Justified means, who paid our debt of sin fully, who made our unrighteousness, righteous in the site of a holly God? Lets see what scripture says.
Romans 3:21 But now the righteousness of God apart from the law is revealed, being witnessed by the Law and the Prophets, 22 even the righteousness of God, through faith in Jesus Christ, to all and on all  who believe. For there is no difference; 23 for all have sinned and fall short of the glory of God, 24 being justified freely by His grace through the redemption that is in Christ Jesus, 25 whom God set forth as a propitiation by His blood, through faith, to demonstrate His righteousness, because in His forbearance God had passed over the sins that were previously committed, 26 to demonstrate at the present time His righteousness, that He might be just and the justifier of the one who has faith in Jesus.
 
Romans 4:6 says "God imputes His Righteousness". His Word Promise's.

Ephesians 2:8 For by grace you have been saved through faith, and that not of yourselves; it is the gift of God, not of works, lest anyone should boast. 10 For we are His workmanship, created in Christ Jesus for good works, which God prepared beforehand that we should walk in them.

1) So who does the justifying or the redeeming?   God does it all, He justified us by His grace through Jesus Christ. It is a gift from God, not a wage that we should have to work for. He is The "Forgiving Father".
2) Why did God do it?   To demonstrate His righteousness to people that aren't worthy of Him, To prove that He is the Justifier, To demonstrate His righteousness, and to show He did this all beforehand!
3) Why is it important to know?  Because we must give ALL the glory to the right person! "For we are His workmanship" and therefore we MUST give Him all the glory so that we "CAN"T and WON'T" boast in ourselves and take His credit". 
  It is human nature to want to think we did it all and have to do more to keep it all but that's not what God wants. He wants us to put our full trust, hope and faith in Him and in order for us to do that we MUST give God 100% of the credit for receiving and keeping of our salvation!
  Do we have a part, Yes, we do have to receive God's precious gift but how do we get to that point? Scripture says that God draws us there through the power of the Holy Spirit. It all boils down to something not taught on much anymore. God's Sovereignty!

More Subject Reading From "The Redeemed Gardener":
"Justification is by grace alone (not mixed with our merit)"

Linked With:
Lets Get Social, Sunny Simple Sunday, Sharing His Beauty, Hear it on Sunday Use it on Monday, Teach Me Tuesday, Winsome Wednesday, Wise Women Linkup, EOA Link up, Simple Living Wednesday, The Country HomemakerFreedom Fridays, Themed Blog & Shop, Farmgirl Blog fest, Simple Natural Saturdays

Sunday, February 10, 2013

Urban Gardening and Off The Grid in the City????

  I ran across this video the other day and wanted to share it. I'm sure many have seen this but it is such an inspiration to those who think to themselves, "I can't garden, farm or be off the grid in the city, I don't own a farm"! Well think again, this California family has done it and with a little imagination you can as well. My hats off to them! As you watch this video share with us your ideas to achieve such a wonderful thing. Maybe you are already on your way to this or have already achieved it. Whatever the case, share your thoughts and even a link to your blog showing us. If you would like to go to my blog search button I have many posts to help you get started as well with Urban Gardening or click here for my top 10 posts for 2012 to get started!
They also have a website that documents their journey The Urban Homestead, or you can visit them at http://www.dervaesgardens.com/. Either way you go this is an inspiration since the price of food is so so high and even what you do buy is so mass produced that it doesn't have any taste of nutritional value! Happy Gardening and May God Bless you!
This is part of my Urban Garden!


Deuteronomy 28:12 "The Lord will open to you His good treasure, the heavens, to give the rain to your land in its season, and to bless all the work of your hand"

Linked With:
Lets Get Social #7, Sunny Simple Sunday,The Creative HomeAcre Hop,Clever Chicks,Harvest Monday, The Backyard Farm Connection,Frugal Tuesday, EOA Linkup, Simple Living Wednesday, Wicked Awesome Wednesday, The Country Homemaker, The HomeAcre Hop, Down Home Blog Hop, Home and Garden Thursday, Simple Lives Thursday, Frugal Days, Sustainable Ways, The Country Garden Showcase, Fertilizer Friday,Freedom Fridays, Themed Blog & Shop, Farm Girl Blog Fest, Farmgirl Friday, Simply Natural Saturday,

Sunday, February 3, 2013

"Shadow or not there's still work to be done"

  February is here and whether the groundhog saw his shadow or not doesn't really matter to the gardener. Gardeners have learned through the ages that a ground rodent can't predict the weather any more than the weather guy on T.V. We know that God is the maker of the weather and only He knows what its gonna do! So shadow or not there's still work to be done. That being said here is a list that you can roll up your sleeves on and get to work! Here is February's Garden to do list.
Plants that you can start sowing indoors are:
  • Head Lettuce
  • Cauliflower
  • Celery
  • Broccoli
  • Cabbage 
Plants that you could sow in an outdoor cold frame or outdoors:
  • Leafy salad greens
  • Seed Onions
  • Other Greens
  • Peas outdoors
Other things that you can be doing in February is:
  • Continue in payer and Bible study
  • Cut back on feeding houseplants (do not feed dormant houseplants)
  • Make sure all your supplies are stocked up, fertilizers, seed starting containers, starting soil, etc.
  • Prune Grape vines
  • Prune Blueberries
  • Prune Deciduous trees and shrubs
  • lime and fertilizers
  •  Order your fruit trees
  I hope this gets you stirred up a bit and out of the house. If I have missed anything please share!


Colossians 2:8 Beware lest anyone cheat you through philosophy and empty deceit, according to the tradition of men, according to the basic principles of the world, and not according to Christ. For in Him dwells all the fullness of the Godhead bodily; 10 and you are complete in Him, who is the head of all principality and power.

Linked With:
The Creative HomeAcre,Clever Chicks Hop,
Harvest Monday, Teach Me Tuesday,Frugal Tuesday,The Backyard Farm Connection, Frugal Days Sustainable Way, Down Home Blog Hop, Wicked Awesome Wednesday, Country Homemaker Hop, Simple Living WednesdayHome and Garden Thursday, Simple Lives Thursday, The Country Garden ShowcaseNatural Life Link up, Thursdays Favorite Things,  Farm Girl Friday, Farm Girl Blog Fest, Clever Chicks Blog Hop, On it, In it and Around it, A Pinteresting Party, Sweet Saturday 

Saturday, February 2, 2013

Worm Tubes, "A Worms Buffet"

   While doing the 3 part soil series, I was asked many times more about the "Worm Tubes". So I thought maybe I should do a quick post to help explain a little more. They are really easy to make and install any they help attract your "Garden Champions". It's like making a "Buffet" in your garden for them, its up to you if you charge them or not, lol!
    First you will want to make a trip to the plumbing dept. of your favorite hardware store or if you have a "Habitat for Humanity Restore" in your area you can go there as well and probably get your supplies you need! (it doesn't have to be new)
    Here is this list you will need: 1) A piece of 3" or larger PVC Drain pipe. You can get the french drain pipe with the holes already in it or you can drill the holes yourself, (Holes need to be large enough for your worm customers to enter, lol). 2) You will need 1 cap to fit each worm tube that you are making. 3) If you don't have a saw to cut your pipe, you better swing by the tool dept. as well!
Pipe you need
Cap you need


   So you have your supplies, know for the fun part, unless you are like me and love to go to the hardware store! 
  1. Cut your pipe into 3' sections or longer depending how much you want above ground.
  2. At this point if your pipe doesn't have holes you will need to drill holes in it 3/4" or larger, (I feel larger if you can). Leave the end of the pipe that is barred cap free!
  3. Dig down, in your garden area, 2' to 2 1/2' (use a post hole digger for a nice round hole) you can go deeper if you would like as well.
  4. Place pipe in hole vertically into ground 2' to 2 1/2' into ground and back fill dirt.
  5. Start dropping your kitchen scraps into the tube and put the cap on, so you can easily remove it!   Note: Follow the same guidelines for this that you would your compost bin. Don't put greasy foods, meats, ect. into the tubes!
  You can do this in a conventional garden or raised beds if you would like. A hint for conventional gardens: you could use a large trash can! Just cut the bottom out of it, drill holes in the sides and put it halfway or deeper in the ground. Use it the same way but with this one you could drop small amounts of leaves or grass clippings in as well!

  I hope you have fun with this and I am sure some of you will even come up with cleaver, artistic ways to  disguise them in your garden. When you do, please stop back by and drop us a link so that we can come see! Here is the finished product for you as well.
See them in the Corners?

More on soil:
"Black Gold and Other Soil Amendments"
"Garden Soil Part 1"
"Garden Soil Part 2" 
"Garden Soil Part 3"
"My Neighbors Raised beds"

Matthew 25:37 “Then the righteous will answer Him, saying, ‘Lord, when did we see You hungry and feed You, or thirsty and give You drink?
Linked With:
Lets Get Social Sunday,  Simple Sunday, The Creative HomeAcre,Clever Chicks Hop, Harvest Monday, Teach Me Tuesday, Frugal Tuesday,The Backyard Farming Connection, Frugal Days Sustainable Way, Down Home Blog Hop, Wicked Awesome Wednesday, Country Homemaker Hop, Simple Living Wednesday, Home and Garden Thursday, Simple Lives Thursday, The Country Garden Showcase, Freedom Fridays, Thursdays Favorite Things, Fridays Fertilizer Flaunts, Natural Life Link Up, Weekend Whatever, Farm Girl Friday, Farm Girl Blog Fest, Clever Chicks Blog Hop, On it, In it and Around it, A Pinteresting Party, Sweet Saturday