Showing posts with label Urban Garden. Show all posts

Sunday, July 6, 2014

Harvesting "Fingerling" Potatoes!!

  Well, I've started harvesting potatoes here in West Virginia! This is a new type for me, we planted "fingerlings" alone with the old standby Yukons. While the Yukons are not ready yet, the fingerlings are ready to dig. What are these potatoes that I speak of? Fingerling potatoes, so named because they resemble fingers. These small, waxy, narrow, elongated potatoes typically range from 2 to 4 inches in length. Fingerling potatoes come in a variety of colors, from pale yellow to red to purple. Fingerlings have mild to nutty flavors. Some varieties of fingerlings are hundreds of years old. These potatoes cook more quickly than larger types, maintain their shape well when cooked, and generally create an aesthetically pleasing plating.
   Don't ask what type! I'm really not sure, LOL! When it was planting time, back in March, my wife handed me about 16 of these little babies that had started to sprout and said, "Lets try these too". So I did. These small potatoes produce more potatoes per seed than the normal counterparts and the growing process of these usually takes longer than the normal ones. The storage of fingerlings is done very similar to the regular potatoes which require a dark and cool storage area.

   I planted mine in two half whiskey barrels. In my opinion, these little guys would grow best in 5 gallon buckets of dirt. Why? trust me at harvest time you will thank me! It would have been nice to have just dumped the bucket out to get these little gems. It was kind of like finding a needle in the carpet, lol! But it was well worth it. I will continue to grow them for years to come! So next season when you want to try something deliciously different, try one of the many varieties of fingerling potatoes. I know you will like them as much as my families has!

Sunday, June 22, 2014

June 2014 Harvest

Well, its been a busy month tending to the garden and everything else but in the end its worth it all! I've been
harvesting radishes, spinach, green onions, beets and lettuce. But yesterday I started picking green beans, carrots, a new radish, and cucumbers. I also notices some of my cherry tomatoes starting to blush, so it won't be long there either. Everything else seems to be doing well, just hard to sit and wait, lol!

The Lord shall preserve you from all evil; He shall preserve your soul. The Lord shall preserve your going out and your coming in From this time forth, and even forevermore. Psalm 121:7-8 NKJV

Sunday, June 8, 2014

Growing the Perfect Onion!

   Onion sets you plant in early spring will put on a lot of green top growth before they make bulbs. You may ask, "Why don't the bulbs start forming right away?" The answer is that before the plants can make bulbs, they first have to store energy in the top green leaves. Then they must wait for nature's signal to put this energy into bulb making. The plants usually get the message when the day length and the temperature are right. The onions don't care how old they are or when they were put in the ground; when conditions are right, they simply stop making new leaves and start using the energy they've stored to make bulbs. The size of the onion bulb is determined by how much energy there is in the top green leaves before the light conditions signal to start diverting energy to the bulbs. The more green growth before this time, the more energy there is and the bigger the bulb will be.
   Early planting is important because it gives your onions plenty of time to grow tops and to store a lot of energy for the bulbs. If you put your sets in late, they won't have the time for a lot of top growth. As a result, there won't be much energy available when nature whispers to the onion plant, "Make a bulb."
  A soil pH of 5.5 to 6.5 is considered ideal for onions and there's no need to make trenches or special holes for the sets. Just grasp them at the top (the pointed end) with the root end down and push them into well-prepared soil the full depth of the bulb, about 2".  If you have some tiny sets, plant them at least an inch in the ground, so they get good contact with the soil. The sets will get a better start. After you've got your sets in the ground, firm the soil around them with a hoe.Remember, if a set is planted too shallowly, it takes a long time to get started. It's important to push the bulb all the way into the soil. It gets the onion off to a good start for producing a lot of top growth. If the onion sets are a little too deep, it won't hurt. Later, when the bulbs are expanding, pull some of the dirt away from the sides to give the bulbs room to expand.
  You may not want to plant all your sets at once. Try keeping back a few handfuls in the refrigerator. When you start harvesting some small onions to eat raw or use in salads and other dishes, replace them with sets from the refrigerator. Just remember that onion sets planted later in the spring won't develop into large onions.
Here is a great easy article from WVU on Growing Onions

Tuesday, April 15, 2014

Quick Planting Tip


I was asked when the best time to plant certain things was. Here is the best rule of "green thumb"! 

  Plant potatoes, cold crops like broccoli, cabbage, ect, any root crop like beets, turnips ect, spinach on or after St. Patricks Day. You can remember that by the potato famine that happened in Ireland!

  Plant everything else on or after Mothers Day, at this point most areas have had their last frost. But this isn't an exact science as God always has the last say, but it tends to work for me here in west Virginia!

  These were passed down by Grammie and I'm sure there are other old wives tales on when to plant. Such as my Grammie always went by the farmers almanac and always had a great crop! So if you have any others that were passed onto you please share them!


“A sower went out to sow his seed: and as he sowed, some fell by the wayside; and it was trodden down, and the fowls of the air devoured it. And some fell upon a rock; and as soon as it was sprung up, it withered away, because it lacked moisture. And some fell among thorns; and the thorns sprang up with it, and choked it. And other fell on good ground, and sprang up, and bare fruit an hundredfold. And when he had said these things, he cried, He that hath ears to hear, let him hear.” Luke 8:5-8

Thursday, July 4, 2013

How to Grow Pumpkins Successfully

   I have had a question asked that is post worthy so her we go with the answer and I will try to keep it "Jethro Simplified"! It was a three part question.  (1. I didn't get any female flowers..why? 2. How do you keep the bugs off the pumpkins? 3. How often do you feed and water the pumpkins.)
Cinderella Pumpkins and Squash
 
  First things first, this may help with a lot of things. Did you know that cucumbers, zucchini and pumpkins are all in the same family? Usually the same problems you have with one you will the other and usually the same solutions! I grow "Cinderella" variety and have much success!

You can go back and read "Great Soil Foundation, Parts 1, 2, and 3"

Soil, Water and Planting Spot:
   Pumpkins love good rich composted soil that drains well but also hold moister (Loamy soil), lots of organic matter should be worked into the soil. The perfected soil pH is between 6.0-7.0, so check your soil before planting.
   Pumpkins love lots and lots of sun, so pick an area with 8 plus hours of direct sunlight a day.
   They  require heavy and even watering (because of shallow roots), mulching around them will help hold moister in those hot dry times, Trickle irrigation is best, but soaker hoses also work well. Overhead sprinklers are effective; however, wet foliage increases the chance of disease, especially mildew.
   If you have amended the soil right you shouldn't have to fertilize more than once a week and just an multipurpose fertilizer will work.Giant pumpkin vines require approximately 2 pounds nitrogen, 3 pounds phosphorous and 6 pounds potash per 1,000 square feet of growing space.

Planting and Growing:
  Pumpkins have a very long growing season, some verities up to 120 days (4 months). So start them indoors 3-4 weeks before YOUR last frost or wait til the soil is 70 degrees to direct plant seeds.
  Pumpkins are very sensitive to temperature, so always be prepared to cover them in the early season to protect from cold night or even cold days. They grow best when days an nights are above 70 degrees.

Insects and Diseases:
  The planting site of your plants should be rotated each year to reduce the incidence of insect and disease pressure. An insect and disease control program must be initiated at transplanting. Insects are the primary reason for transmitting disease. Once a viral infection has occurred, there is no way to stop it. But if you start at the beginning and give them lots of soil preparation, water and a control program, this will help drastically. If you need pesticide help, Bonide has many good things to use! Remember if you grow cucumbers and have succeeded then you already have a great foundation for pumpkins!
   Insect pests of pumpkins include spotted and striped cucumber beetles, which can transmit bacterial wilt disease, which causes vines to collapse and die. Treat adult beetles with neem or pyrethrum. Be aware, however, that these are toxic to all insects, including beneficial predators and bees. Make applications at dusk to avoid harming bees. Other insect pests include squash bugs, which must be controlled early or they can be devastating, and squash vine borers.

Pollination:
   Although hand pollination is the preferred method to fruit setting, natural pollination by bees will work well. Hand pollination allows for a more controlled genetic cross.But don't begin pollinating until the plant has approximately 200 leaves. Some experts even say pull the first female flower on each vine to allow your vines more time to grow stronger? Initially it is recommended to allow only 4 to 6 pumpkins per plant but the more you reduce the competition for nutrients, the greater your success rate will be for achieving a giant size pumpkin.

Male and Female Flowers:
  Pumpkin vines are going to produce male flowers long before it produces female flowers. Because female
Female Flower
flowers need to be pollinated, there is no point of them blooming first because the male flower needs to be present in order to pollinate it.
  I wont go into the scientific ways to know the difference, just the way Grammie taught us! To figure out the gender of the flower just look underneath of it. The female flower will have a pea-sized lump underneath the base of the bud. As the bud grows and prepares to open, the lump will gradually get bigger until it is about the size of a doughnut hole. If pollination occurs, this lump will develop into your pumpkin! The male flower is lacking this lump.
 Why do I have NO female flowers?
  If you follow all of the soil preparations, watering, fertilizing and give them lots of sun the should always give you female flower but some years, some crops just fail, its part of the process! So depending on conditions, the female flowers may bloom long after the male flowers. The plants should continue to produce flowers all season, so patience is in order here and lots of patience.
 Again, Be patient. Pumpkins can take a long time to set and develop, especially in shifting weather conditions, i.e. too hot, too much rain, etc. They are very sensitive!

Harvest Time:
   As pumpkins form, you can slip a piece of cardboard or folded newspaper beneath pumpkins to prevent contact with soil and possible rot, especially if you are growing a precious few. Toward the end of the season, remove any leaves that shade ripening pumpkins.Harvest pumpkins before frost. Fruit is ripe when it is fully colored, skin is hard, and the stem begins to shrivel and dry. Pumpkin vines are often prickly, so wear gloves and long sleeves when harvesting to keep from itching. To harvest, cut stems with a sharp knife, leaving at least an inch of stem on fruits (more stem is better). Lift pumpkins by slipping your hand under the bottom of the fruit. Never lift a pumpkin by its stem; if the stem breaks, the pumpkin won’t store well.
Tip: To protect the pumpkin from direct sunlight, construct a shade out of burlap or other lightweight material. This will prevent premature hardening of the outer skin and will allow the pumpkin to reach its full genetic potential in terms of physical size.

Nutritional Facts:
Did you know that Pumpkins are full of nutrition, dishing up vitamin C, beta-carotene, fiber, and potassium. One half cup of cooked pumpkin provides a day’s supply of vitamin A.

Monday, June 24, 2013

"When do we harvest potatoes?"

The Redeemed Gardener
  I had a question emailed to me a few days ago and knew I needed to answer this, the question was; "When do we harvest potatoes?"

  Well, it all depends on what you are wanting. If you want “new potatoes”, small, immature potatoes, you should harvest them before their vines die or earlier in the summer (around the first day of summer). They will be about 1 to 2 inches in size.
 
  If you want mature potatoes, or “late potatoes,” (as Grammie called them) you should harvest them in late summer/early fall. Just wait for the vines and the flowers to die, and then harvest the potatoes at full maturity.
 
  Here's another method we used, If you have a lot of plants, you can harvest some of the plants earlier in the summer and get “new potatoes” and leave the rest to dig up later. Just experiment and try digging some at the end of July, some at the end of August, and some at the end of September. Then next year, you’ll have a better idea about how big they are at what time of the season.
 
 When you go to harvest your potatoes, here is an article that I posted a while back on a cheap Mini Root Cellar.   "Cool, Cheap, Mini Root Cellars"
 
 
 But the Lord is faithful, who will establish you and guard you from the evil one. 2 Thessalonians 3:3 

Wednesday, June 5, 2013

How To Freeze Broccoli

  How To Freeze Broccoli, its very simple! So fare this season I have harvested 16 heads of broccoli and I have frozen 8 heads, which made up 16 quart bags for later use. Yummy!!

  Supplies you will need: Large Pot, knife, couple bags of ice, quart or gallon size freezer bags, Sharpie, Large Strainer Ladle,
The Redeemed Gardener

Step 1: Wash it in a sink full of water, I mix a hand full of Sea Salts in with it. It helps with bugs!
Step 2: Cut broccoli up to sizes that are gonna be easy to eat.
Step 3: Bring a Large pot of water to boil.
Step 4: Put cut up broccoli in boiling water, for 4 to 5 minutes. Note: do amounts that are easy to handle.

While this is boiling, fill up sink half way with water and dump a half bag of ice in.

Step 5: After 4 to 5 minutes ladle the broccoli into the ice water, this will stop it from cooking. Let it set in the for about 5 minutes.
Step 6: Ladle the broccoli out of the ice water and allow water to drain off. I laid mine out on a clean dis towel, you could just use a big strainer. Whatever you choose will be finr.
Step 7: Put broccoli in Freezer bags, label with sharpie. try to get air out of bad. But you don't have to get it all out.
Step 8: Place in freezer til you are ready to cook. Its that easy!!

  If I can do it, anyone of you can do it. And by the way Jesus Loves You!
The Redeemed Gardener


Saturday, June 1, 2013

Staring to Harvest in 2013

  Just a few pictures of what is going on and coming out of the garden!


Broccoli


Carrots

Potatoes

Turnips and Radishes

Before Starting My First Bee Hive

   Well its not really my first "Bee Rodeo" but it will be my first urban bee experience! See, my dad and brother had kept bees years before dad passed away. So now I'm gonna carry on the tradition in the urban setting. There are a few things that a person should do long before they get started keeping honeybees. See, I have started this spring getting everything together but I won't get the bees until next April or May, that's the best time to get a new swarm of bees, so that they can get all the honey they need to make it through the following winter.
  So what are things you should be doing to get ready for your new adventure of bee keeping?
The Redeemed Gardener
  1. Read lots of books and articles about bee keeping (my favorite book, "The Backyard Beekeeper"). Get to know everything from the anatomy of the bee and hive to tricks that more experienced bee keepers have learned. Learn about pest and other things that could interrupt or even kill of your hive.
  2. Find and join your local bee keeping club. Each county in West Virginia has a club, which meets often and you learn loads of stuff. Most libraries hold classes and clinics as well!
  3. Find a neighbor or local that has kept bees for a while and talk with them about what they know.
  4. Contact your local and county government to see if you have any laws or regulations to follow.
  5. Blogs are a great source, just make sure the information is correct before using. Here is one I found in my research  "Early American Gardens".
  6. Try to find a reputable bee supply company to pre-buy your hive body and supplies from. We have a local supplier through our club and the mail order one I use is Brushy Mountain Bee Farm.  

      Many thing should be do before you even think about buying your first swarm of bees. Even though I helped them a lot, I have still learned a lot during the preparation period. But most of all have fun!

     Proverbs 24:13 "My son, eat honey because it is good, And the honeycomb which is sweet to your taste;"

Saturday, May 25, 2013

Bolting Spinach

  Well you know what it means when spinach starts to "Bolt"? It means its time to harvest it all!
But what is bolting? In a little 2'x2' patch, I harvested close to 10 gallons of spinach in all! Bolting is when agricultural and horticultural crops prematurely produce a flowering stem (or stems) before the crop is harvested, in a natural attempt to produce seeds to reproduce.
What causes Spinach to bolt?   Spinach bolts quickly to seed during the long days in late spring or summer. Warm temperatures accelerate this development. Varieties that are "long standing" or slow to bolt are best adapted for spring planting.
Spinach Bolting
 The variety I planted was: Winter Bloomsdale (45 days, tolerant to cucumber mosaic virus, slow to bolt, cold tolerant, good for over-wintering)
 I trust these helps and really growing Spinach is very easy and you can grow it in spring and fall!

Friday, May 10, 2013

"Colonial Gate Closer", What is it?

  Do you ever get tiered of having to go behind people and shut your garden gates or are you just wanting to add a little interest to your garden? Then try a "Cannonball Gate Closer", they are traced back to Colonial times in America and may go back even further than that. We found ours in Colonial Williamsburg, VA. It makes it much easier when you came through the gate with your hands full to shut the gate. Plus not to many people know what they are so its a great conversation starter as well.

"The Redeemed Gardener"
Matthew 7:14 "Because narrow is the gate and difficult is the way which leads to life, and there are few who find it."

Sunday, May 5, 2013

Around the Redeemed Garden in 2013! Part 2

  I told you I had more for you to see, lol! If you didn't get to see Part 1, there it is! So much to do and so little time but the rewards are well worth it all.

Solomon Seal peaking over the bench!


   These two pictures are of what we all call "The Secret Garden", it is where my daughter and her friend next door have sat and played for hours. Its a shared space and brings us closer with our neighbor. Years ago it was all grass and it a 11'x28' area. My wife and I made many trips to the rivers in the West Virginia area and collected each rock and hauled them back (lots of fun stories there). I hand dug all the grass up, pored all the sand to set rocks in,  painstakingly sat each rock by hand, pored pea gravel between the rocks and planted each shade loving plant. Lots of hard work but well worth the finished garden! And there is my little garden sidekick, Maple!


  Here are the new additions to the front gardens. On the left, we had to remove a storm damaged bush, so we replaced it with a male "China Boy" Holly. Yes, you do have to have a male and female bush of this verity to produce berries! We also planted another Dwarf Boxwood. Its a little empty looking now but it will fill in quickly. On the right, is our new "Flowering Purple Plumb", if you will remember we had a bad storm, called a "Derecho" hit us, and it took out one of my "Bradford Pears". We just replaced it and we think we will like this specimen much better! Read more on my thoughts of "Bradford Pears", in "Bradford Pears, You can Keep Them".

  I know this isn't part of the garden but she is such an obedient and loyal friend! This is a make shift bench beside my garden, I call it my prayer bench. When we go to it she knows not to cross the railroad ties for anything, she lays right there. As you can see, I have my coffee, read the scriptures, pray and listen to God's creation as the sun comes up or goes down as often as we can. We could all learn a lot from how unconditional a dog loves!
  I'm sure more will come as the season progress. Until next time, God Bless and happy gardening!

Psalm 12:10 "A righteous man cares for the needs of his animal."

Around the Redeemed Garden in 2013! Part 1

  I have been so busy with family, work and work around the house that I feel as though I am chasing my tail sometimes. I trust all my friends in blog land have been working hard in your gardens as well? I wanted to share some pictures today of not only my Veggie garden and my flower beds around the house. It seems like this is one of the busiest times for us in the garden before letting God take care of the rest. Here is whats happening around "The Redeemed Garden"!


  Our Lilly of the Valley is blooming so wonderfully and in the right photo (from front to back) we have Spinach, Lettuce and our cucumbers are reaching up for the trellis!


  In the pot we have our Carrots ( a great way to grown them) and the old Whiskey Barrel serves well to grow potatoes. To the right we have Broccoli, radishes, beets, turnips, Peppers, and tomatoes. Each week more will be planted, just all that we have right now!


  One of our Lilacs that is blooming and smells so wonderful. My great grandma Bakers Lilac that I planted from a start off the old farm stead finally bloomed after 6 years of being planted, that was exciting! On the right is the rose garden, the head board is just for decoration!

  Well I will leave you hanging with this, I'm gonna post more in the next post for you to see and enjoy! Remember to keep your priorities in order, God being first on the list, and everything else He will take care of!
"Be anxious for nothing, but in everything by prayer and supplication, with thanksgiving, let your requests be made known to God; and the peace of God, which surpasses all understanding, will guard your hearts and minds through Christ Jesus." Philippians 4:6-7

Sunday, April 21, 2013

More Raised Bed Gardening???

  Well I had a good day in the Garden! I added more raised beds, I'm running out of space to plant. It seems that when your family starts to understand how much better home grown veggies taste and how much healthier they are for your, you have to grow more. Which is a great thing! So I added 48 more square feet of garden space to my Raised Beds. Here is the best thing, all it cost me was the labor. How you may ask did I do that? Well, this past fall, when I pulled in from work, I realized that the neighbor had a big pile of scrap boards that they were throwing out. So I knocked on the door and asked if I could have them and they said YES! So you see, "One mans trash is another mans treasure"! Here is some pics for ya!
New 5' x 8' Bed
New 2' x 4' Bed


  So you see don't let living in the city keep you from getting your hands dirty and growing your own veggies! You can Urban Garden for a very inexpensive cost, if you just think! You might be saying, "where do I get the dirt to fill them up?" Well most of mine is from my compost bins or my good friends horse farm, there are many Soil Amendments available. You can also do a "HUGELKULTUR", Raised Bed Experiment, like I have done, if you would like. Where there is a will there is a way! Just start small and build your way up to whatever size you may need. Maybe even ask a neighbor to help and it can become a group effort, many community gardens have been started like that. The main thing is have fun!

Matthew 19:19 "‘You shall love your neighbor as yourself.’ ”

Linked With:

Sunday, April 14, 2013

"Planting space between tomatoes and Planting tips"

 Its getting time here in West Virginia to plant tomatoes out doors! I usually wait until around "Mothers Day", but this year I may do it a little early and just watch the night time weather for frost and such. What brought this question up, was a friend ask me for some tips on tomatoes and I thought I had this on here but I didn't.

So, how far apart should I space my tomato plants?
  This depends on whether you are staking, caging, or letting them sprawl and on the particular variety’s growth habit of dwarf, determinate, or indeterminate.  
  Staked indeterminates can be grown with spacing of 1 foot between plants, caged indeterminates can be grown with spacing of 2 feet between plants, and for sprawling, you need at least 3 feet between plants.  They will be more productive if more space is given.I have grown indeterminates 3 feet between plants and 4 feet between rows (remember is you are planting in raised beds you can get by with 2 feet but that's as close as I would go)..  This gives them enough room to sprawl out and really produce.  
  Determinates can be planted a bit closer than indeterminates especially if they are let sprawl.  They will produce well with 2 feet between plants and 3 feet between rows.  Again, I have gotten by with a little closer but remember, the more light and air the more productive they will be.
  The dwarf varieties are suitable for pot culture but if grown in soil, they can be planted as close as 1 foot apart.  
  A major contributor to the spacing question is the area of soil the roots expand into.  A large tomato plant may have roots 3 feet or more deep and up to 10 feet long from the plant stem occupying up to 300 cubic feet of soil.  Most people plant tomatoes too close together which reduces overall production.  If given a choice between having more plants with less fruit or less plants with more fruit production, I would never plant indeterminates closer than 3 by 5 feet! But sometimes we don't always have that space.
  The soil should be a good quality loam with loose texture.  Since most of us don't have soil with those characteristics, it is best to work on building up the soil we have.  A soil test will tell the pH level and give recommendations to raise or lower it if needed.  Tomatoes grow best in soil with a pH of 6.0 to 6.5 which is just a bit on the acid side.

Planting Tip:
  Start by getting a vigorous seedling to set out, hopefully that you have started.  Mix topsoil, 5 gallons of high quality compost, 1 cup of 13-13-13 fertilizer, ½ cup of cane sugar, ¼ cup of table salt, Ground tho powder eggshells and 1 level shovelful of hardwood wood ashes in a wheelbarrow.  As you plant Put 3 inches of of mixture in bottom of hole, put an inch or so of plain topsoil on top and set a seedling into the plain soil so that its roots can grow into the amended soil beneath. For the 1st week or so water everyday with a couple cups of warm water to stimulate plant growth, remember tomatoes are warm weather plants.

More Good Reads:
Heirloom vrs. Hybrid Part 1
Heirloom vrs. Hybrid Part 2
Saving Tomato Seeds

Genesis 2:8 The Lord God planted a garden eastward in Eden, and there He put the man whom He had formed.

Linked with:
Weekend Whatever, Simply Natural Saturdays, Party Time, Sunny Simple Sundays, Monday Funday, More The Merrier, Clever Chicks Blog Hop, Natural Living Monday, Harvest Monday, Homestead Barn Hop, Teach Me Tuesday, Backyard Farming Connection,

Wednesday, April 3, 2013

Maintaining A Healthy Rain Barrel

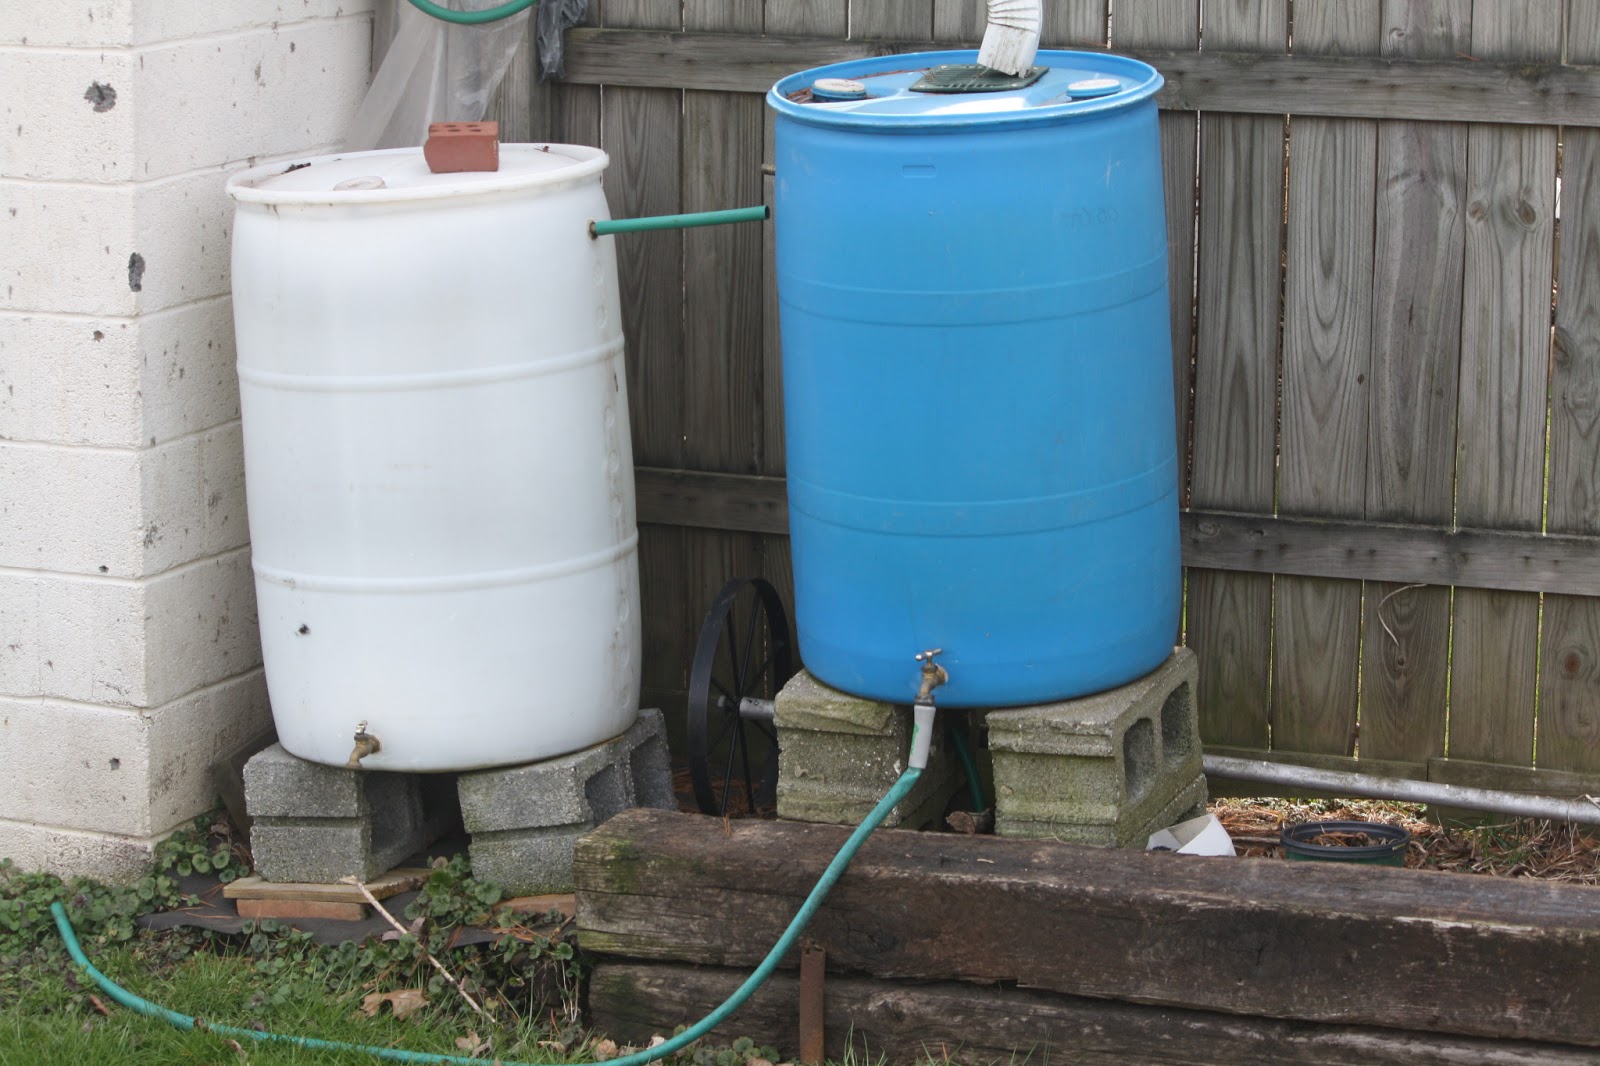
  It doesn't matter if you collect rain water for your own consumption or to water your garden, you still need to do a yearly maintenance to them. Why? Its to keep them in tip top shape and it keep's the water in them safe for you and your plants.You wouldn't believe the stuff that gets inside of them, especially when they aren't in much use (in the off season)! So what are the thing's you should do to your rain barrels or other rain collection systems? (Click her to learn how to make a Rain Barrel)  Also You may like Got Rain Barrel Questions?
  Take a good look at them before you even drain them and remove them from the stand you have them on. As you can see by from my pictures, the winter freezing of the ground made mine a little unlevel and some of  my connections come apart. So I will have to fix that as well!
See how the became unlevel

Check All The Hardware:
  You will want to totally drain your barrel before you get started. Then Check all your valves, connection, screens that you may have at the enter point and the overall condition of the barrel or container, replace anything that needs replaced. Look inside it, I am sure you will see lots of yucky stuff, maybe even algae but that's okay we are gonna take care of all of this shortly and even have some preventative maintenance. At this point just spray out with you garden hose as much as you can.

Clean The Inside:
  If you need to scrub the interior of the barrel a long handled brush will work well. Using a mixture of  light bleach and water solution; scrub the interior of the barrel’s walls and bottom with the brush. Then rinse your barrel again and let dry. This is something that you may not have to do if you have a constant flow of water going through your barrels. But if you forgot to drain all the water out for the winter, Yuck!


Tip: Paint your rain barrels a dark color to prevent the sunlight from directly hitting your water and promoting algae growth.

Purifying The Water For Drinking and To Maintain:
  You can add a little household bleach to your water to keep it maintained through out the year. A little won't hurt you plants either. I would put a little less in the water if you arn't gonna drink out of it and it will still keep the water cleaner!
   According to the Red Cross, “The only agent used to purify water should be household liquid bleach. Add 16 drops of bleach per gallon of water if the water is cloudy (with an eye dropper), stir and let stand for 30 minutes. (If it’s clear, only add 8 drops.)  If the water does not have a slight bleach odor [after 30 minutes], repeat the dosage and let stand another 15 minutes.”  Use household bleach (5.25% sodium hypochlorite as its only active ingredient) and yes this is for drinking!
 
How much bleach to use for purifying water for drinking (according to the Red Cross):

amount of water clear water cloudy water
1 quart 2 drops 4 drops
1 gallon 8 drops 16 drops
5 gallons 1/2 teaspoon 1 teaspoon
55 gallons 5 1/2 teaspoons 11 teaspoons

After I built a foundation out of railroad ties.

 Revelation 21:1"And he showed me a pure river of water of life, clear as crystal, proceeding from the throne of God and of the Lamb."

  Linked With:
Blog It UP!, Down Home Blog Hop, Home and Garden Thursday, Thursdays Favorite Things, Simple Lives Thursday, The HomeAcre Hop, Bloglovin, Friday Fertilizer Flaunts, Freedom Fridays, Linky Love Blog, Simply Natural Living, Farm Girl Friday, Homestead Saturday, Pinteresting Party, Sunny Simple Sunday, MMM, Clever Chicks Hop, Natural Living Monday, Harvest Monday, Teach Me Tuesday, Backyard Farm Connection, Tuesday Garden Party

Friday, March 15, 2013

"Get Started Gardening With The Right Seeds"

   Well Finally! Over the past week I have been able to get my hands dirty in the garden. I have been on cloud 9. First last weekend I got all my tomatoes and peppers started and under the lights. And as of today I have my broccoli plants in the ground. Along with turnips, beets, 2 different radishes, spinach and salad lettuce. But I believe I have ran into a little problem, I think I am gonna have to expand and build more raised beds. See the problem is, I want to plant more that I have room for, SO, off to build I go! At the bottom of this article I left links to some of my past article gardening tips for you to enjoy!
   I also want to give a shot out for Botanical Interest Seed Company! All of my seeds that (I didn't save from last season) came from them the past two years. I have had great success with their products! At Botanical Interests, not only is the seed inside our packets the highest quality available, their packets are designed (inside and out) to give you the information you need to be a more successful gardener!
  • Over 500 high-quality varieties
  • Many heirloom seed varieties
  • A large selection of USDA Certified Organic seed varieties (learn more about organic seed)
  • Guaranteed - the germination rate of every variety is tested before we package it
  • All our seed is untreated
  • No GMOs - we enthusiastically signed the SAFE SEED PLEDGE: We do not knowingly buy or sell genetically engineered seeds or plants
  •  

Here is more great articles from "The Redeemed Gardener" on Seed Starting:

"Sink or Float Tip"
"Heirloom vrs. Hybrid Part1"
"Damping - Off 101"
"Jell-O in the Garden"
"Hugelkulture Beds"
"Reaping What you Sow"
"Most Important Seed"

Linked With:
Weekend Whatever, Simply Natural Saturdays, Simply Sundays,Lets Get Social, The Creative Home Hop, Banquet of Talent Linky Party, Monday Funday, More the Merrier Monday,Clever Chicks Blog Hop, Harvest Monday, Teach Me Tuesday, Backyard Farming Connection, Tuesdays Garden Party, Wicked Awesome Wednesday, EOA Wednesday, Country Homemaker, Wednesday Party Link,Simple living Wednesdays, Down Home Blog Hop, Home and Garden Thursdays, Simple Lives Thursday, Farmgirl Friday, Freedom Fridays, LHITS Linky,

Sunday, March 10, 2013

First step To Sowing Seed Outside

  Knowing when to expect frost is a huge factor in figuring out what to plant and when to plant it. Use this frost chart as a guideline for planning your spring and fall gardens.
  The frost chart below is organized by USDA Hardiness Zone, but understand that these dates are approximated based on years of regional weather data. In most cases, the first and last frost will occur within two weeks of the date listed, but wacky weather patterns can result in a very early frost or late frost. Use the chart as a guide for planting, but count on your local weather forecast to plan frost protection measures. 
                                                    USDA Hardiness Zone

First Frost Date Last Frost Date
1 July 15th June 15th
2 August 15th May 15th
3 September 15th May 15th
4 September 15th May 15th
5 October 15th April 15th
6 October 15th April 15th
7 October 15th April 15th
8 November 15th March 15th
9 December 15th February 15th
10 December 15th January 31st (sometimes earlier)
11 No frost. No frost.

Saturday, February 23, 2013

Pruning Tip's

  This is a great time of the year to prune your trees and shrubs. There is less disease and insects, if any, to get into the freshly pruned area and create havoc! When I wanted to learn "How To Prune" a tree or shrub correctly I turned to the experts. I am not ashamed to say that we just fired up the chain saw and went to cutting up things on the farm. The experts I turned to was The Arbor day Foundation, they know a thing or 2 about trees, lol! Here is what they had to say!
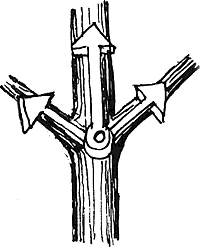
  1. Begin visual inspection at the top of the tree and work downward.
  2. Angles 
  3.  Use The ⅓ and ¼ Rules of Pruning
    1. Never remove more than ¼ of a tree’s crown in a season
    2. Ideally, main side branches should be at least ⅓ smaller than the diameter of the trunk.
    3. For most deciduous (broadleaf) trees, don’t prune up from the bottom any more than ⅓ of the tree’s total height.
    4. Where possible, try to encourage side branches that form angles that are ⅓ off vertical that form “10 o’clock” or “2 o’clock” angles with the trunk.
  4. For most species, the tree should have a single trunk. Identify the best leader and later branches before you begin pruning and remove defective parts before pruning for form.
  5. Don’t worry about protecting pruning cuts. For aesthetics, you may feel better painting large wounds but it doesn’t prevent or reduce decay.
  6. Keep tools sharp. One-hand pruning shears with curved blades work best on young trees.
  7. For high branches use a pole pruner. A major job on a big tree should be done by a professional arborist.
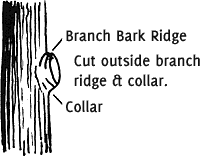
  8. Ridge & Collar For larger branches, cut outside the branch bark and ridge collar (swollen area). Do not leave a protruding stub. If the limb is too small to have formed a collar cut close.


  9. When simply shortening a small branch, make the cut at a lateral bud or another lateral branch. Favor a bud that will produce a branch that will grow in desired direction (usually outward). The cut should be sharp and clean and made at a slight angle about ¼ inch beyond the bud.
    Correct Pruning Cut Too Close Too Long Too Slanted
    Correct Pruning Cut Too Close Too Long Too Slanted
  Thats the Basics! Sometimes its okay to admit you you don't know everything or didn't learn everything growing up and had to find out on your own but that's what make use stronger! If you want to learn more on, "Pruning away the Bad, stuff", read this!


"[People] are not naturally inclined to look at themselves honestly, to perform a self-evaluation under the bright and perfect light of God’s Word. They know instinctively that their pride, self-will and love of sin will be exposed under the Lord’s righteous standards." ~ John MacArthur

Sunday, February 10, 2013

Urban Gardening and Off The Grid in the City????

  I ran across this video the other day and wanted to share it. I'm sure many have seen this but it is such an inspiration to those who think to themselves, "I can't garden, farm or be off the grid in the city, I don't own a farm"! Well think again, this California family has done it and with a little imagination you can as well. My hats off to them! As you watch this video share with us your ideas to achieve such a wonderful thing. Maybe you are already on your way to this or have already achieved it. Whatever the case, share your thoughts and even a link to your blog showing us. If you would like to go to my blog search button I have many posts to help you get started as well with Urban Gardening or click here for my top 10 posts for 2012 to get started!
They also have a website that documents their journey The Urban Homestead, or you can visit them at http://www.dervaesgardens.com/. Either way you go this is an inspiration since the price of food is so so high and even what you do buy is so mass produced that it doesn't have any taste of nutritional value! Happy Gardening and May God Bless you!
This is part of my Urban Garden!


Deuteronomy 28:12 "The Lord will open to you His good treasure, the heavens, to give the rain to your land in its season, and to bless all the work of your hand"

Linked With:
Lets Get Social #7, Sunny Simple Sunday,The Creative HomeAcre Hop,Clever Chicks,Harvest Monday, The Backyard Farm Connection,Frugal Tuesday, EOA Linkup, Simple Living Wednesday, Wicked Awesome Wednesday, The Country Homemaker, The HomeAcre Hop, Down Home Blog Hop, Home and Garden Thursday, Simple Lives Thursday, Frugal Days, Sustainable Ways, The Country Garden Showcase, Fertilizer Friday,Freedom Fridays, Themed Blog & Shop, Farm Girl Blog Fest, Farmgirl Friday, Simply Natural Saturday,